How to Draw a Cargo Plane Step by Step
Powered flight has now been going since 1903 when the first uneasy takeoff by the Wright brothers in a motorised glider took the human race into a whole new world of adventure.
With fourth dimension, however, many distinctive aircraft have emerged, and none more and then than gainsay aircraft. In this tutorial, come with me as we look at drawing an iconic plane from World War 2, the Supermarine Spitfire.
ane. How to Fix Accurate Perspective
Pace ane
Firstly we are going to plant a guideline for our plane, get-go with a horizon line. Since the Spitfire has a rather distinctive wing shape, we want to describe the plane at an angle that best demonstrates this, so y'all desire to be cartoon your horizon line across your page just above the halfway betoken.


Stride 2
For this drawing we are going to be using but a single vanishing point. This particular betoken needs to be correctly placed, and with this specific picture you may find this is off the page. Therefore, to ready this up correctly, you may have to use a single piece of masking tape placed on one side of your sheet (it volition be the right side in this item example) and then add your bespeak using a steel ruler.


Pace 3
Having drawn your vanishing bespeak, accept your ruler again and draw a single line from the signal across the canvas marking the middle of the plane torso.


Pace 4
Next, draw a line that volition be used every bit a guide for the top of the body.


Step five
And so, draw in a third line that will be used every bit a guide for the bottom of the body.


Footstep 6
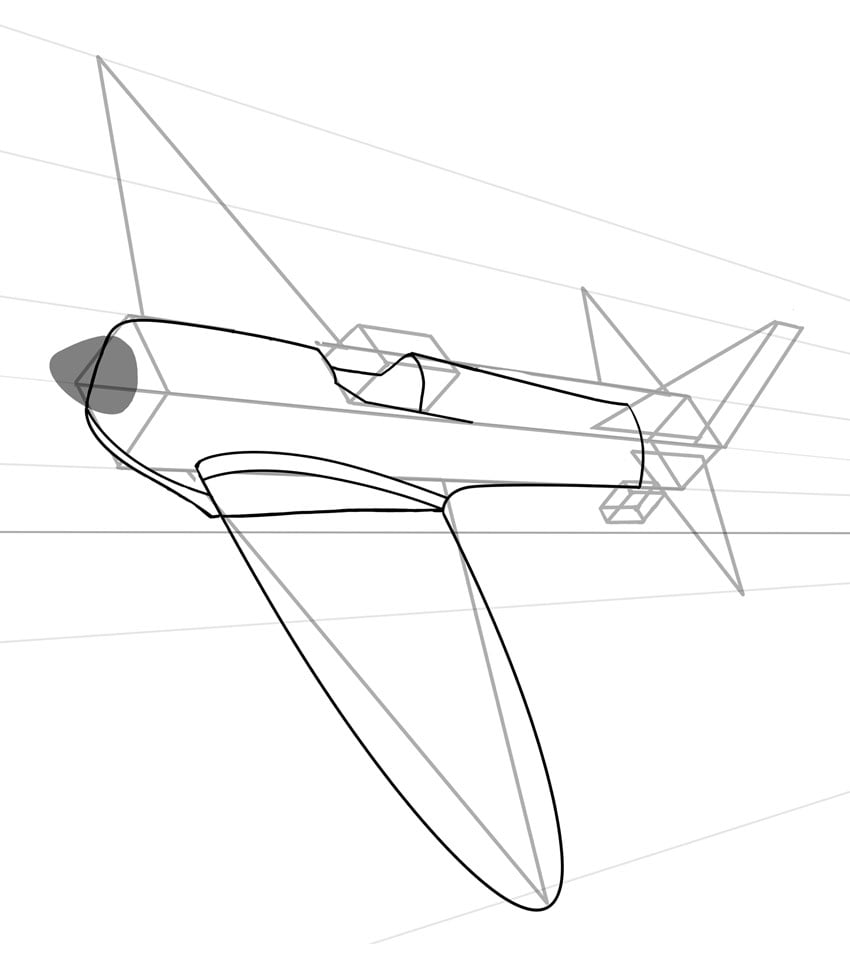
We need to add pointers for the wings, which of course are essential to whatever aircraft. Starting with the wing closest to the viewer, a line needs to be drawn from the vanishing point to the betoken where the tip of the wing will be.


Footstep 7
You so need to depict in some other line for the opposite wing. At this point, if you have placed your points correctly, a fan-like blueprint should be emerging.


Footstep viii
To finish this stage, nosotros demand to add two more lines both at converging angles, which volition exist for the rear flaps that come out of either side of the rear of the aeroplane and the rudder at the rear. These boosted parts help steer the aircraft and requite it stability in the air.


Stride ix
Now we have crude guidelines that we tin utilize to kickoff blocking our aircraft out.


2. How to Create a Plane From Basic Shapes
Step i
Now that we have established the perspective setup for our Spitfire, nosotros will block it out using simple shapes. Nosotros shall start with the body, which y'all can make using a simple long angled box. If you lot have set upwards your guide correctly, information technology should be fairly simple to draw this shape.


Footstep 2
Nosotros shall piece of work on this airplane going from left to correct, but if you are left handed y'all can work in the reverse management. On summit of the original box needs to go a smaller cube for the cockpit expanse.


Stride iii
Aslope our first 2 shapes need to come the wings, and for these we are looking to create simple triangles that will form a basic construction of this section of our shipping. Nosotros shall showtime with the one closer to us.


Step four
Don't forget to draw in another triangle for the second fly on the opposite side.


Stride 5
For the rear flaps of the aeroplane, we need to draw another two triangles, simply make certain these are half the size of our offset two.


Step vi
For the main section of the rear rudder, we need to add together an up angled triangle.


Step vii
A sparse rectangle should then be drawn, placed to the right alongside the triangle in Step 6, which volition be for the steering section of the rudder.


Stride 8
Yous can besides add a small-scale cube underneath the body of the plane that will be the abaft wheel which supports the rear of the shipping on the basis.


Step 9
Hopefully, you should now have a skeleton of a plane that looks something like this!


three. How to Depict an Aircraft in Detail
Footstep 1
Having got the skeleton of our plane set upwardly, we shall now draw it in more item. You volition have to use a steady mitt and a lot of care if you are using ink at this bespeak! Once more, nosotros shall piece of work left to right and start with the nose of the plane.


Step 2
Nosotros and then move on to the trunk section as it follows the nose. At this stage, avoid drawing in the details in the cockpit section as it'due south more important to get the main parts of your aircraft correct before going into fine item.


Step 3
After the torso section, you tin can now add together the wings. The Spitfire has a rather distinctive rounded wing shape, which makes it instantly recognisable to enthusiasts. For pilots, information technology as well fabricated it a much ameliorate handling automobile than its counterparts, so make sure you take time to become this function right.


Stride 4
For the opposite wing, the perspective and angle of the plane affect how much we can see, so a fair department will be hidden past the cockpit and engine compartment.


Footstep v
Like the primary wings, the rear flaps have a rounded shape and then demand to be fatigued with care. The Spitfire was one of the very last front line propeller fighters to feature a large forepart wing design; mod-twenty-four hour period fighters all adopt a large arrow-like shape.


Step 6
Following on from the flaps, nosotros now motility to the tail of the plane. Again, aerodynamics and piece of cake flying were in mind with the design of this aircraft, so a rounded tail was a must, with a large rear rudder department.


Pace 7
To consummate this stage, we tin at present add together the rear trailing cycle in more detail.


Step 8
Now, we should have a more than refined illustration to look at. During World War Two, the Spitfire was assisted in bringing down enemy planes by the Hawker Hurricane. The Hurricane was of a slightly less aerodynamic design merely just as constructive at bringing down enemy bombers. The principal fighter plane enemy to face the Spitfire was the German Messerschmitt BF109, which had a like acme speed to the Spitfire but was not quite every bit easy to wing, thus giving British pilots a slight edge in the air.


iv. How to Add Finishing Touches to an Aircraft
Footstep 1
We at present come to the finishing details. This is the part where all the pieces come together and yous can add together your own little touches to really personalise your own creations.
First, we can add the propeller of the plane and, as the aircraft is in move, it is very simple to draw a bones ellipse. Be sure to practice drawing these outset if yous feel you need to!


Step 2
To give the impression of motion, vary the thickness of your drawn line and erase little sections of your circle with a fine eraser. If you wish, you tin can add in some zig-zag lines to requite the impression of speeding propeller blades, but be sparing with how many you put in. In this tutorial I have used just two lines.


Stride iii
Other little touches to add at the front of the aircraft are the serial of exhaust vents that run down either side of the olfactory organ, simply only one side is visible here.


Step 4
Underneath the Spitfire is a vent that allows direct airflow into the engine system.


Step 5
Now nosotros can describe in the cockpit area, starting with the airplane pilot and what limited control equipment you can see.


Step six
For the pilot, you can either use references from various print or online sources to help construct him or, if you lot are confident enough with your drawing skills, you can construct him from scratch yourself.


Step 7
The sliding glass cockpit embrace and front screen come next. Thanks to perspective, parts of these ii components may obstruct the pilot and controls, so you may demand to erase fiddling sections in society to bring the puzzle together.


Pace 8
Now we move to the wings, and firstly we shall depict in the machine gun holes on the wings. Thankfully these days these ports are simply a showpiece, and they have not been fired in acrimony for some time.


Step 9
Don't forget the steering flaps on the rear of both the wings.


Step ten
On superlative of the cockpit sits the radio aerial mast. Advice between pilot and ground control was still as important then as it is now.


Step 11
An aerial line runs from the aeriform mast to a clip on the tail of the plane. In these still relatively early days of air-to-air radio, a line was essential for clear communication, just every bit time has progressed this line is not needed. The Spitfire and its counterparts were really some of the last shipping to use this dated organisation.


Step 12
Every bit we are budgeted the end, any additional small details tin can be added. At this signal, also, you can add your ain picayune touches to make your aircraft unique.


At Final, the Cease Is Nigh!
Finally, you can now erase all of your structure lines and make clean upwardly your line art, and we now accept a completed historical aircraft to look at!


So there we have a complete illustration of a truly historic slice of flying history that has been in the skies for the past 80 years. You can at present add a bear on of color to this epitome if you wish to really bring it to life! I also hope I take at least given y'all some inspiration now to get and endeavour it yourself and be audacious, just as the designers and pilots of the Spitfires were all those years ago. The sky is the limit!


macdonaldhatat1938.blogspot.com
Source: https://design.tutsplus.com/tutorials/how-to-draw-transport-drawing-an-historic-plane-from-scratch--cms-27437
0 Response to "How to Draw a Cargo Plane Step by Step"
Enviar um comentário